Manually Add Receipts or Bills
If you don’t have a physical copy of the bill/receipt or if the bill/receipt is handwritten, old, or of poor quality, the automatic scanning process may not be possible. In these situations, you can choose to manually add the bill as an entry in Miragebooks.
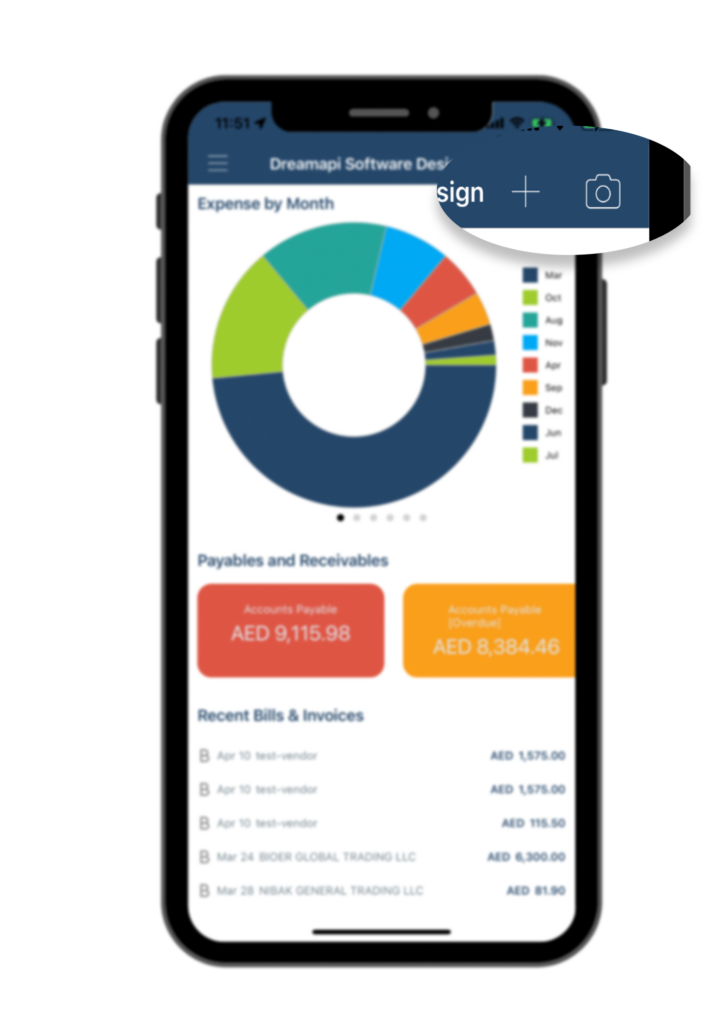
Go to the dashboard page and click on the “+” button at the upper right corner, next to the Camera button.
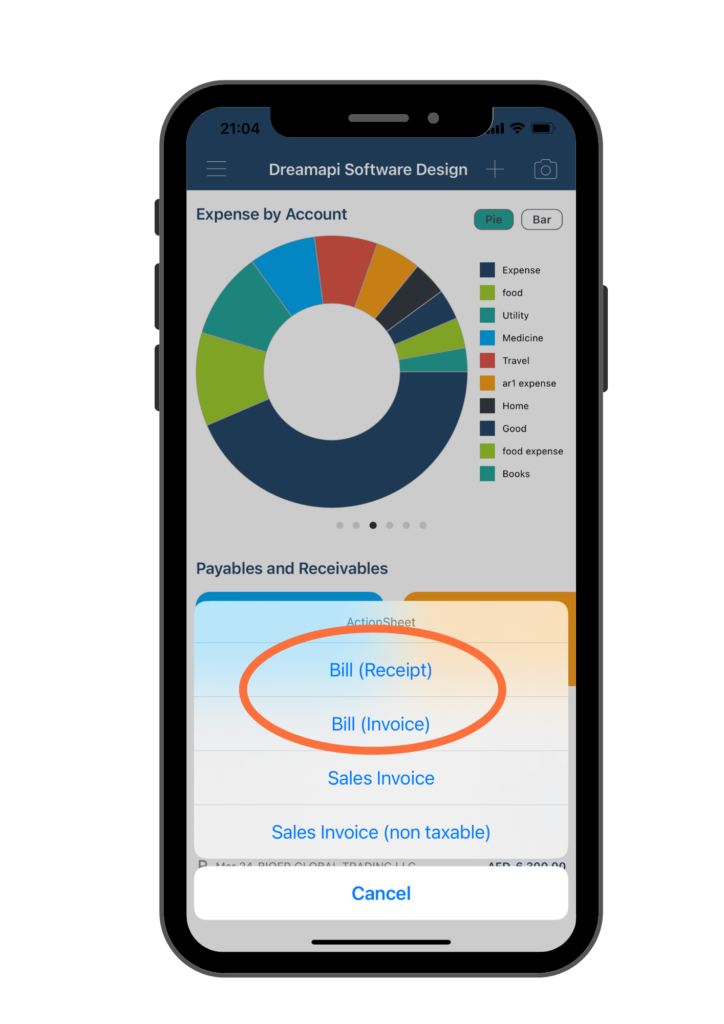
You will be presented with an Actionsheet with four options for adding the bills or sales invoices. The first two options are for manually adding bills or receipts, as shown in the picture below:
💡 The main difference between Bill (Receipts) and Bill (Invoices) in Miragebooks is that Bill (Receipts) is more suitable for scenarios where there is only one line on the receipt with a total amount. On the other hand, Bill (Invoices) allows you to input multiple line items for a single bill or receipt.
💡 In other words, if you have a simple receipt with just one total amount, then Bill (Receipts) would be the better option. However, if you have more complex bills or invoices with multiple items, then Bill (Invoices) would be the way to go.
Option 1: Bill(receipts)
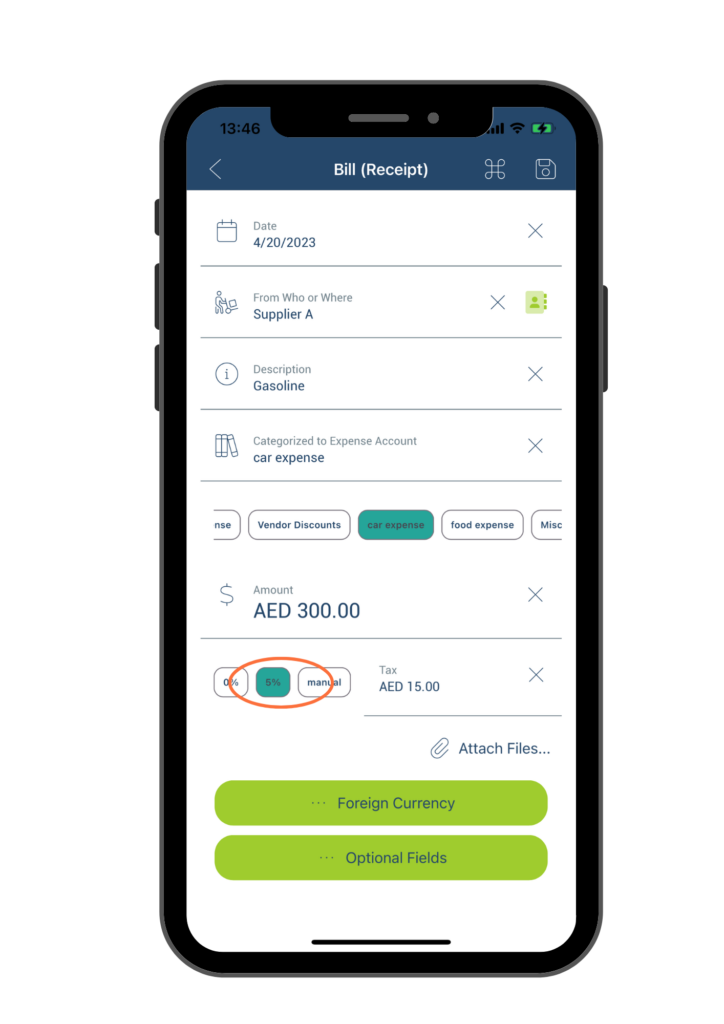
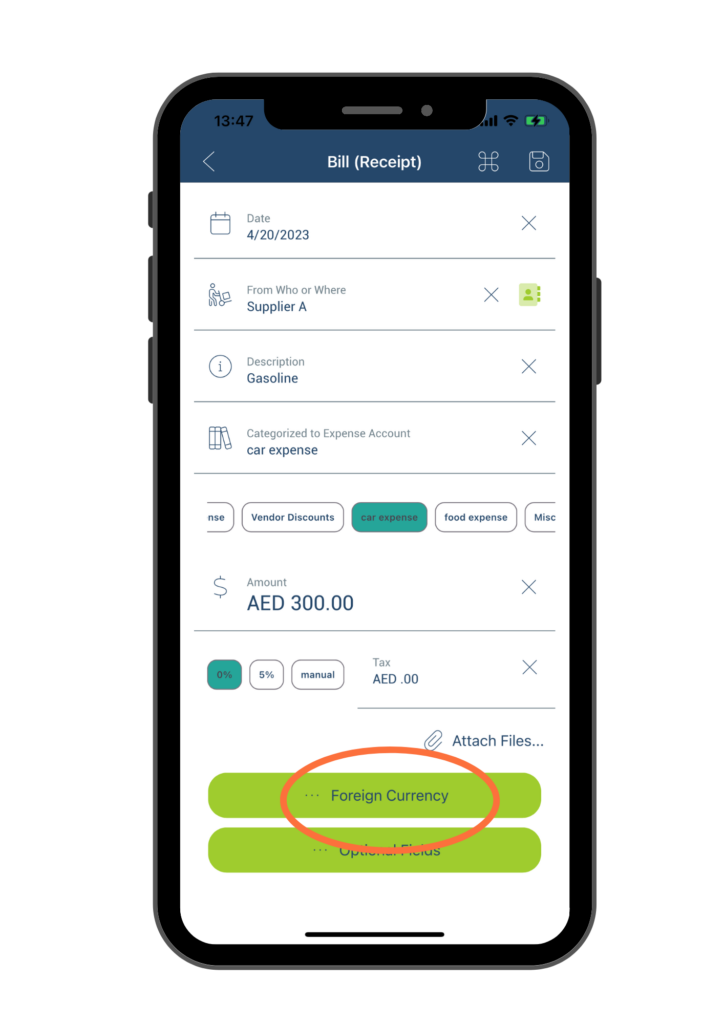
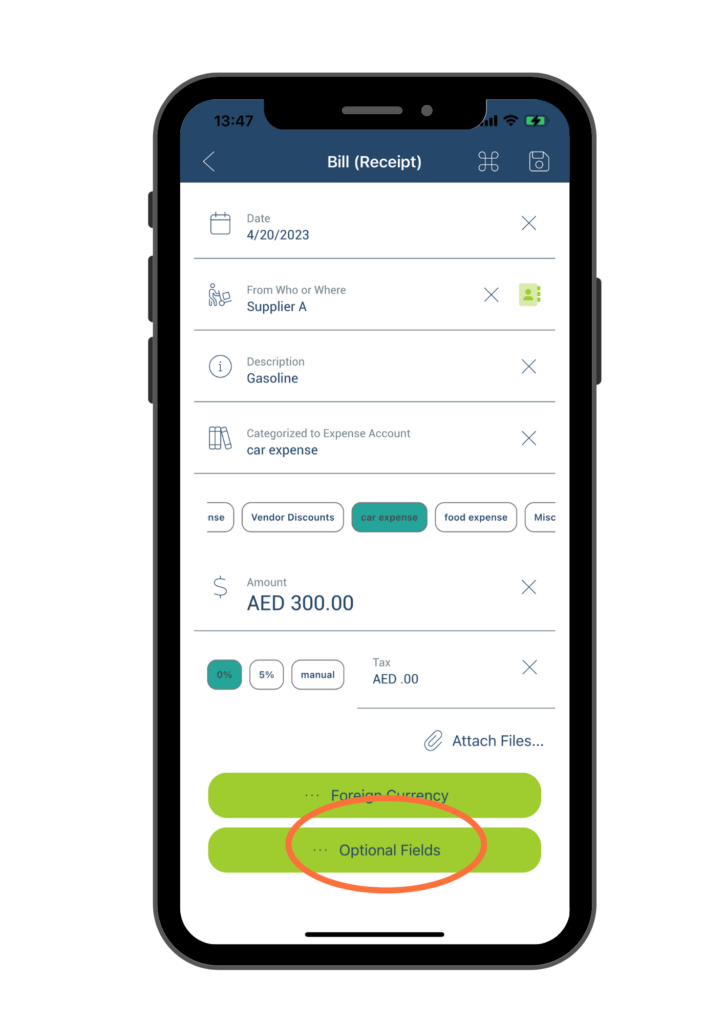
If you have a receipt to add to the entries, click on Bill(receipts). You will be brought to the form titled Bill(receipts).
Follow the steps below to fill in the form.
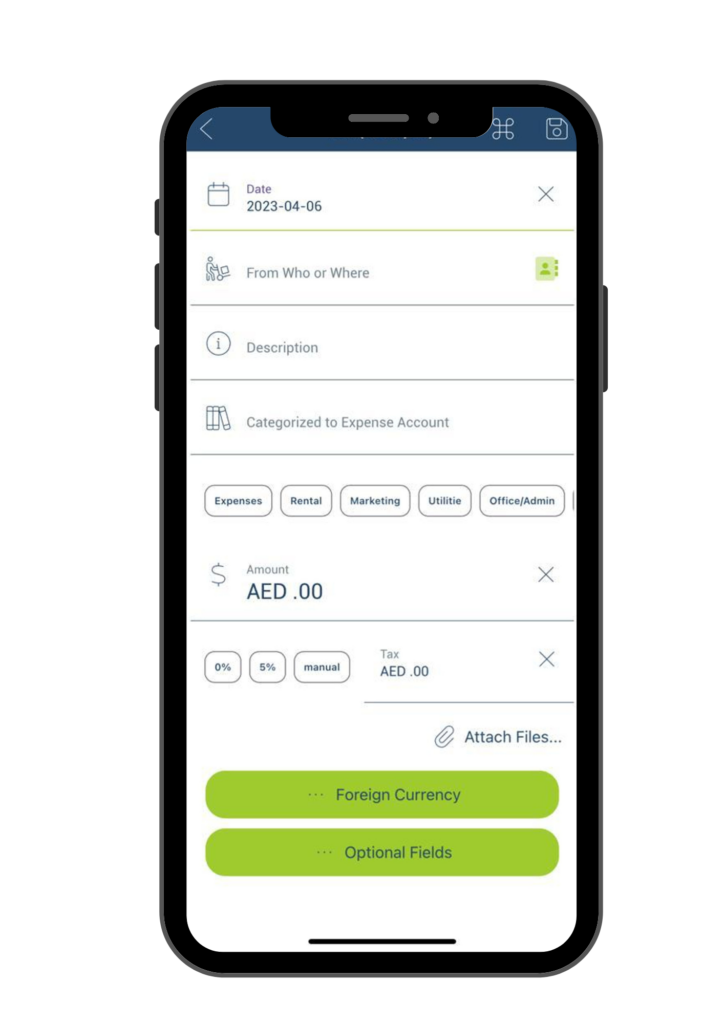
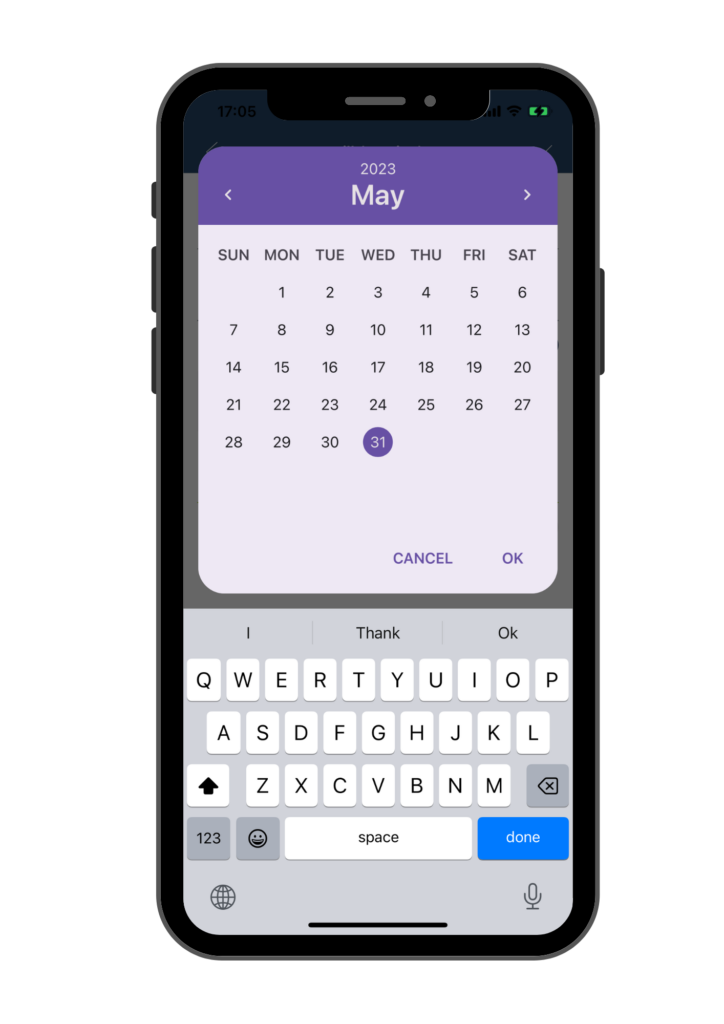
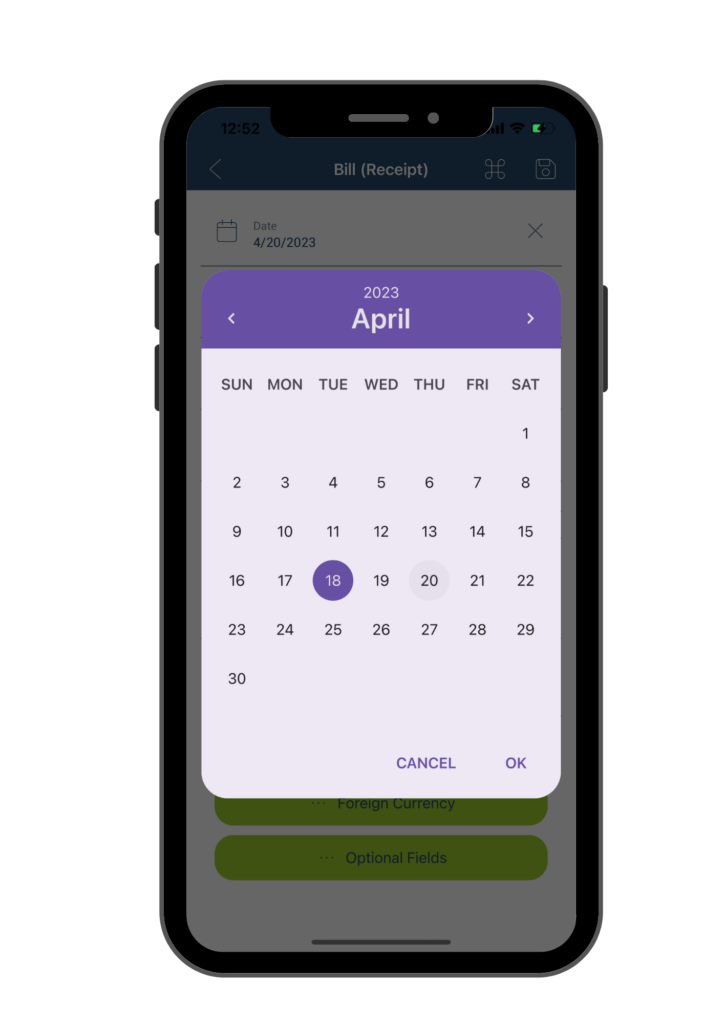
A. Add or edit Date – Click on Date, a calendar would pop up where you can select the correct date, then click OK to save the change and exit.
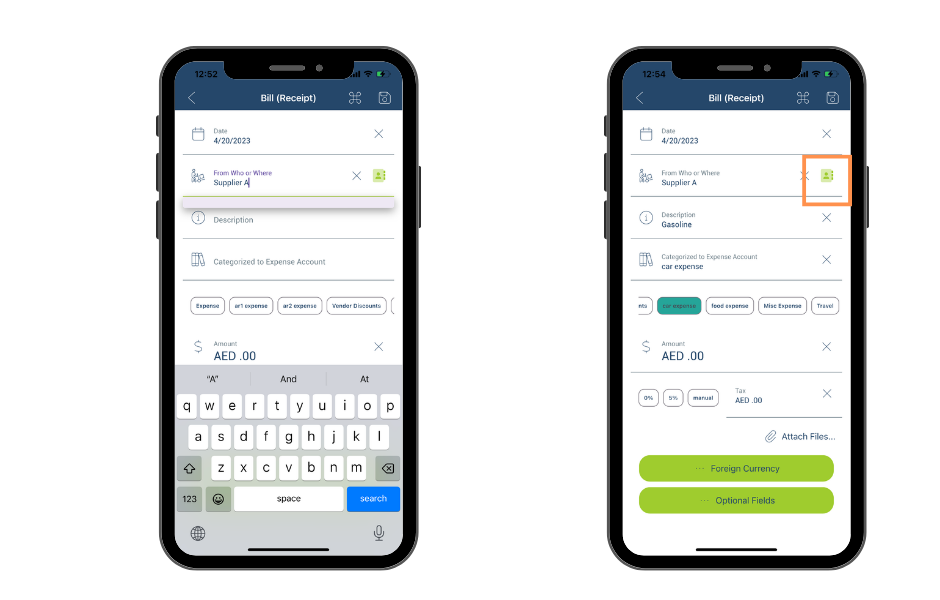
B. Add or edit From Who or Where – Click on From Who or Where, you can then either manually enter the merchant name or, click the “Contact” icon and choose the contact from your phone contact, if this merchant/person is already in your contact list.
Our application will automatically save the contact name entered, making it available as a suggestion for future bill creation with the same contact. This feature eliminates the need to manually type the contact name, saving time and reducing typos.
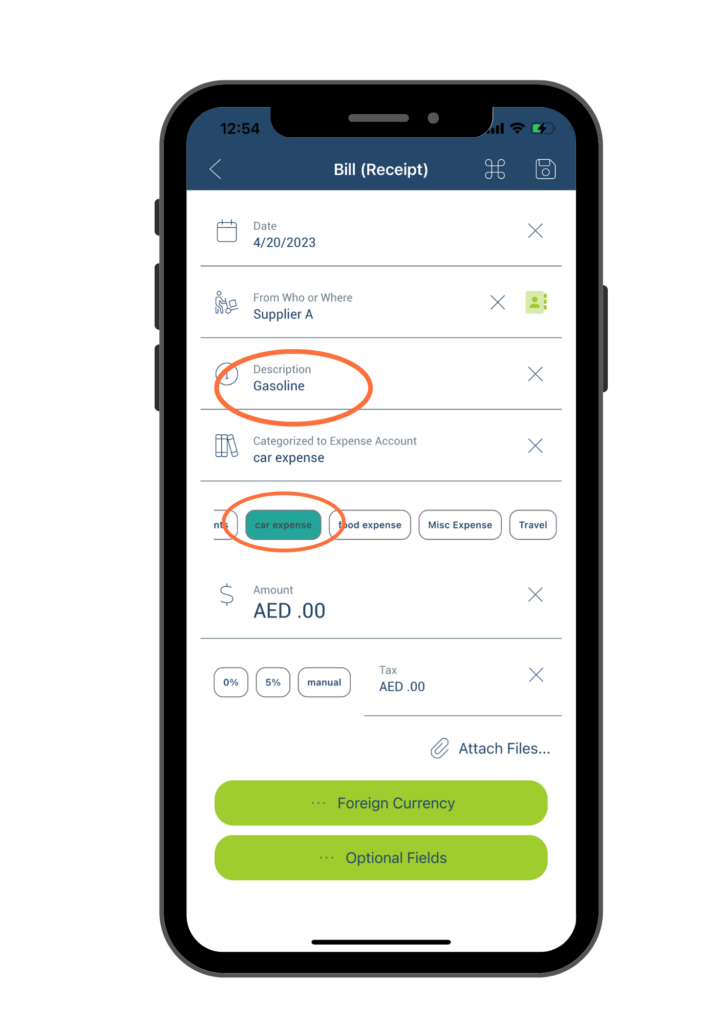
C. Add or edit Description – This field is used to describe what you are paying for. For example, if you are purchasing a professional logo design service, you may write “Logo design service” in this field.
D. Add or edit Categorized to Expense Account – To categorize your expense or cost in the receipt against a financial account, you must fill in the Categorized to Expense Account field. The application displays a list of default accounts that you can choose from. You can swipe left or right to view all the available options and select the most appropriate account for the bill. If the desired account is not listed, you can manually enter the account name in the designated field.
Our application will remember the account name you entered and it will appear in the account list for you to choose the next time you create a new bill.
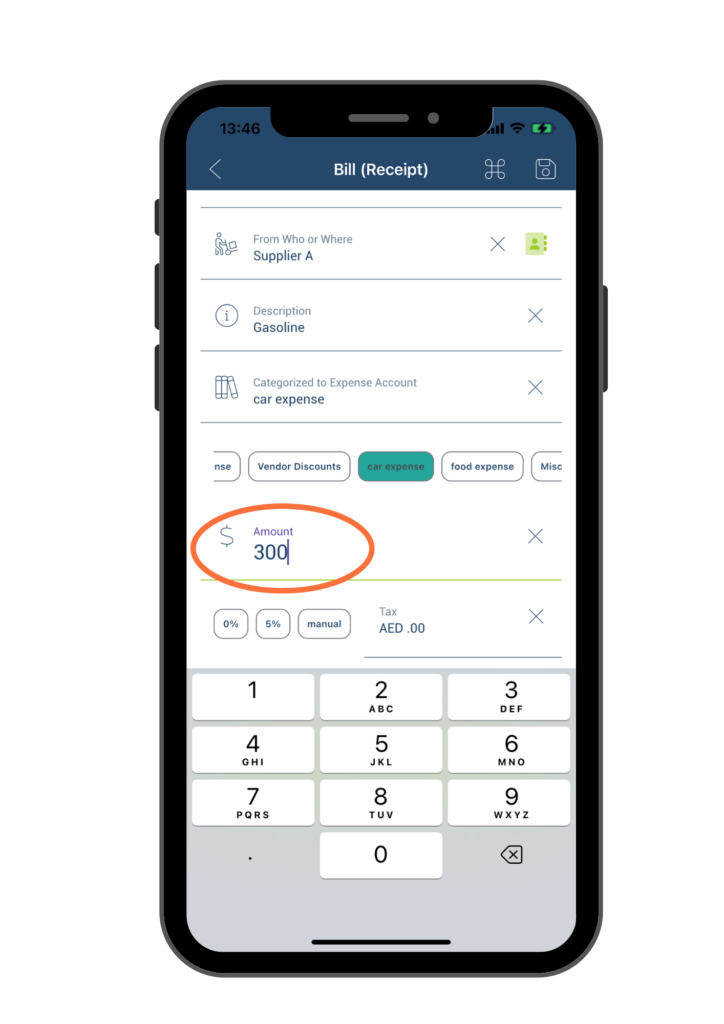
E. Add or edit Amount – Click on the Amount field and enter the total before-tax amount that appears on your receipt.
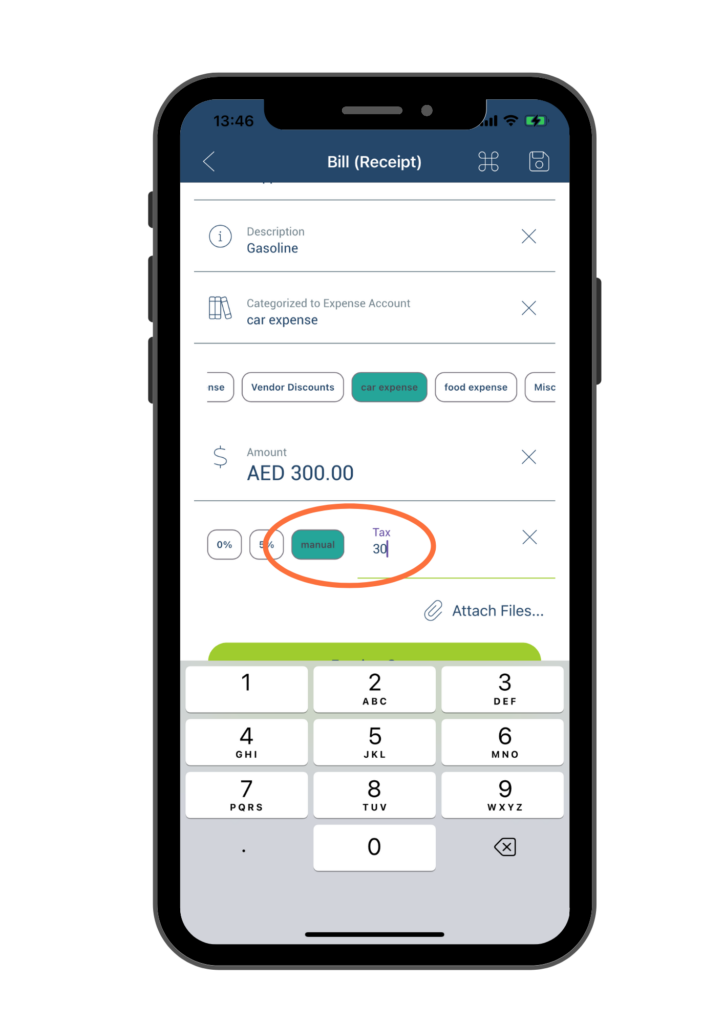
F. Add or edit Tax – To include the tax applied to your purchase, click on the Tax field and input the amount of tax that was applied. In UAE, the standard VAT rate is 5%, and you can quickly input this rate by tapping the 5% button.
If a different tax rate was applied, you can tap on the manual button then manually enter the tax amount in the Tax field. Please note that when manually entering the tax, you need to input the exact tax amount instead of the tax rate. For example, if the tax amount on your receipt is AED 12, you should enter 12 in the Tax field.
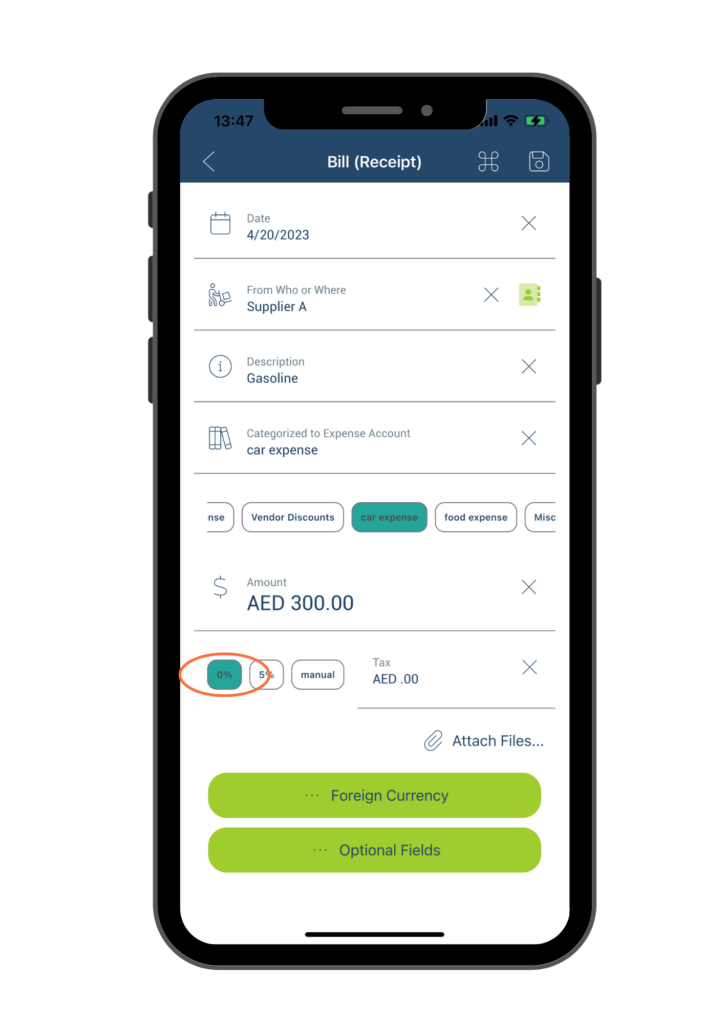
To indicate that your purchase was not taxed, simply click on the 0% button in the Tax field.
G. Attach Files – To save a copy of the original receipt or other relevant documents for future reference, click on the Attach Files button and upload a photo of the document.
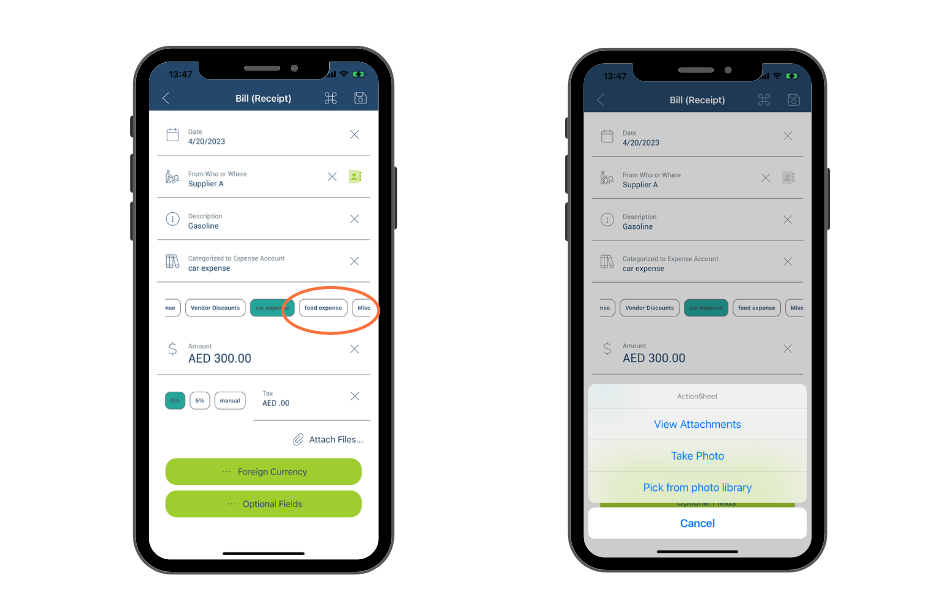
Once you click on the Attach Files button, you can either choose to take a photo of the document by selecting Take Photo or choose an existing photo from your library by selecting Pick from photo library. The photo will be automatically uploaded and saved.
In the future, you can view the saved document photo by clicking on the attachment file and selecting View Attachment.
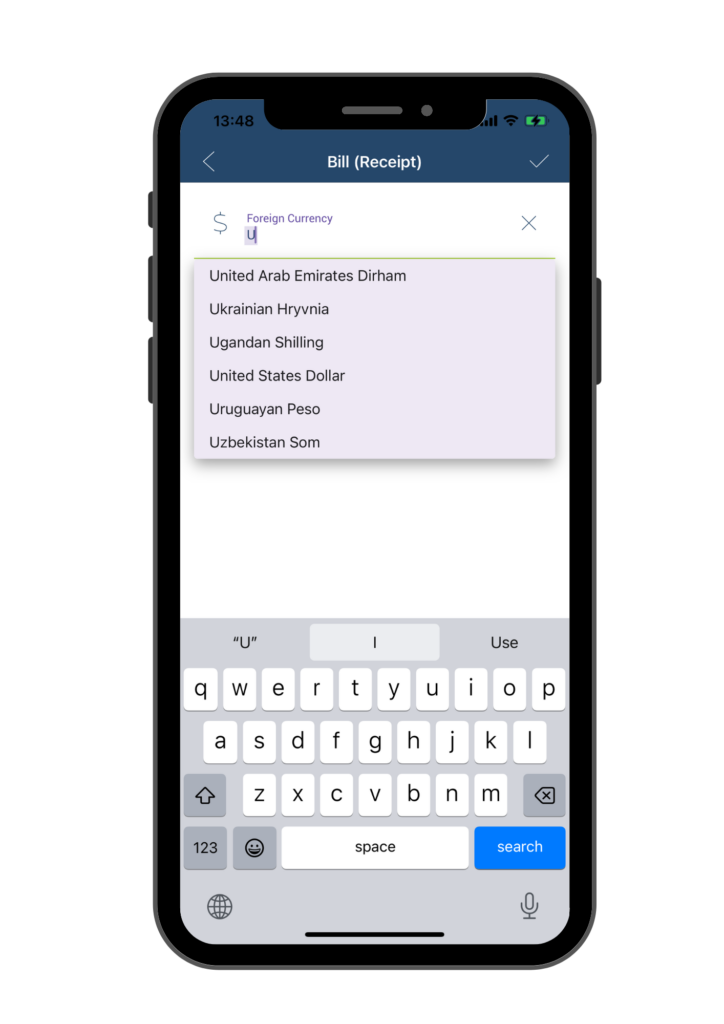
H. Change Foreign Currency – If the receipt is in a foreign currency other than AED, click on the Foreign Currency button to change the currency.
To enter currency information, key in the name of the desired currency in the Foreign Currency field. For example, to select USD, enter “United States Dollar.” Alternatively, you can enter the letter “U,” and the system will suggest “United States Dollar” in a drop-down list. Simply select the appropriate currency from the list.
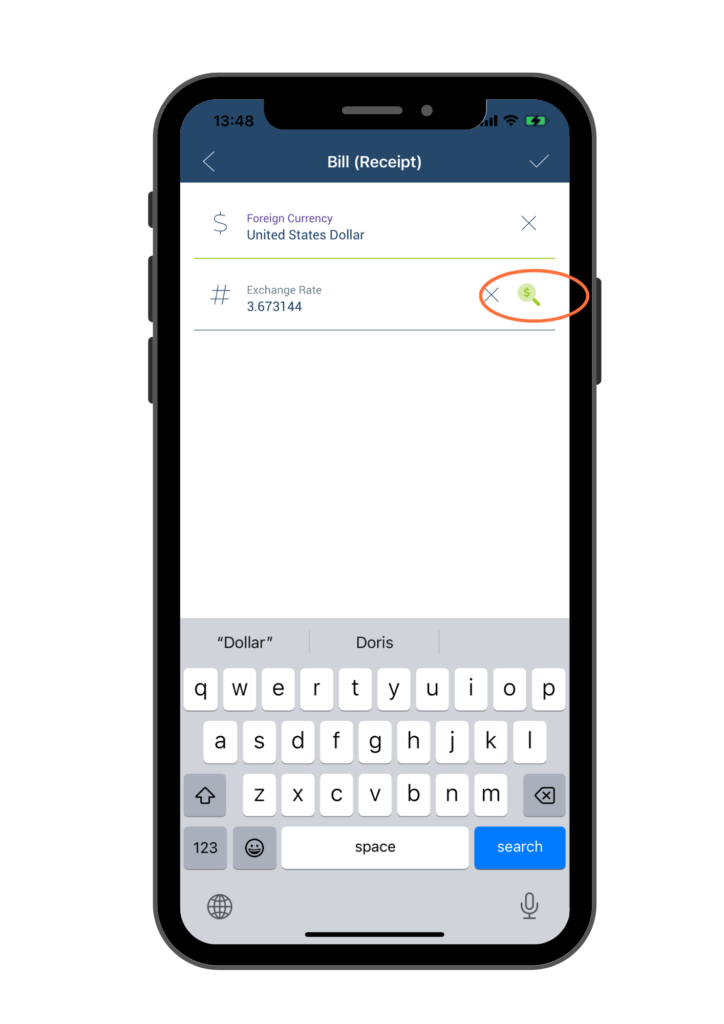
After you select the name of the foreign currency in the Foreign Currency field, click on the Magnifying Glass icon to retrieve the real-time currency rate. Once the rate is populated, click the Check button at the upper right corner to save the change.
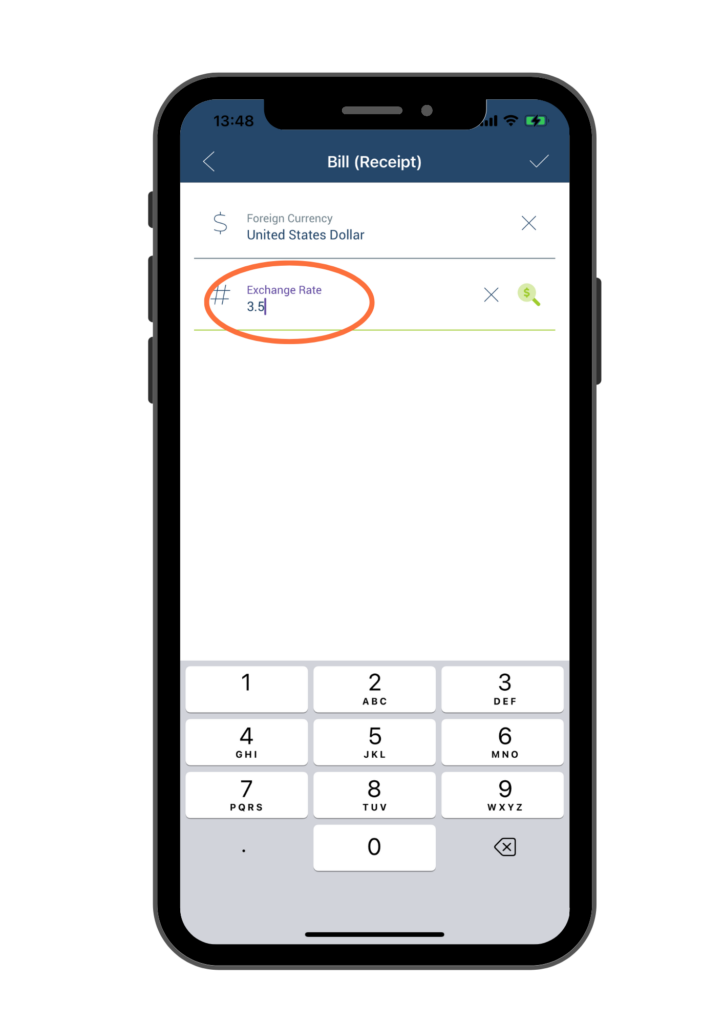
Sometimes it is necessary to manually enter a specific currency rate instead of using the real-time currency rate. To manually enter a different currency rate, type the desired rate in the Exchange Rate field, then click the Check button at the upper right corner to save the change.
I. Add or edit Optional Fields
This feature allows you to keep a record of additional information related to the receipt for future reference. To access this feature, click on the “Optional Fields” button located at the bottom of the form.
You will be directed to the page shown below, where you can enter additional information about the receipt. Please see below for a detailed description of each field:
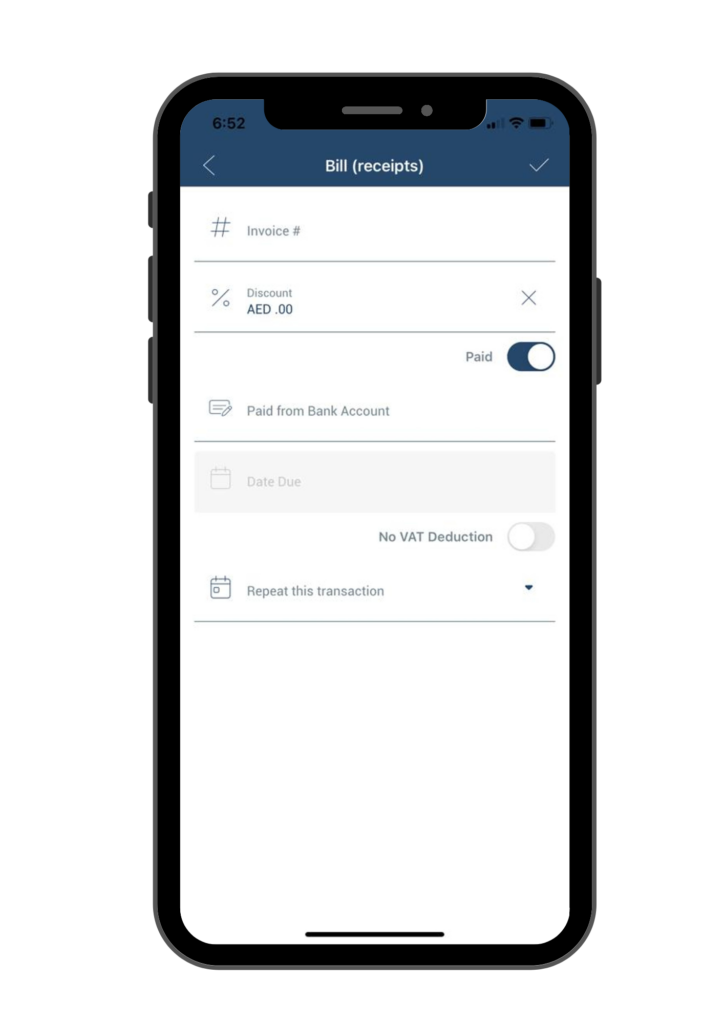
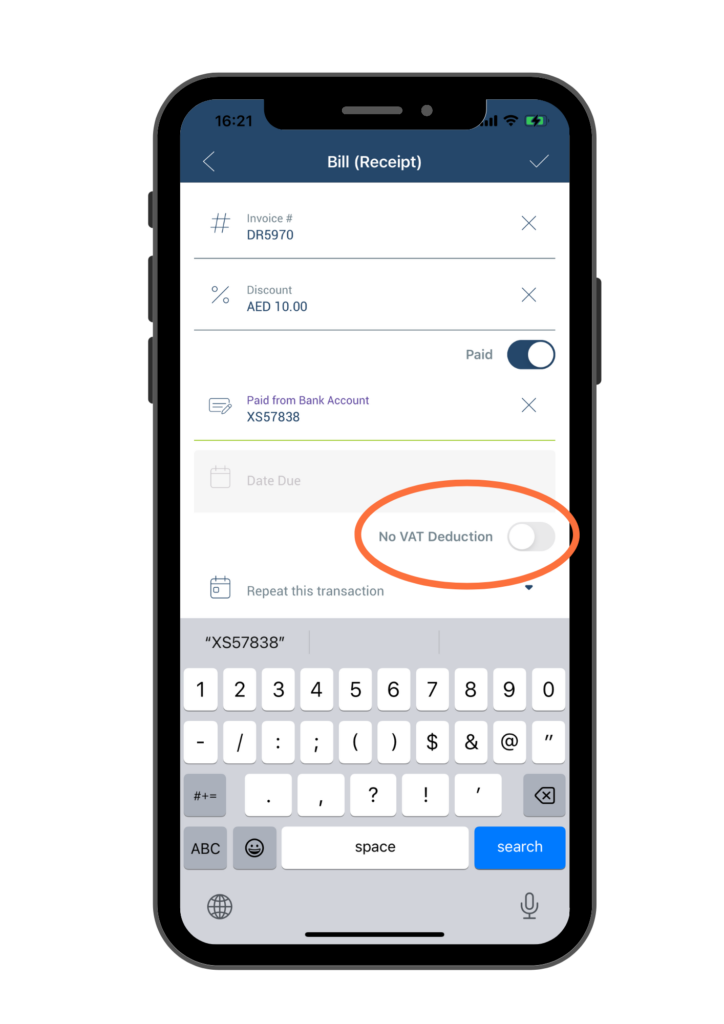
a. Invoice# – If there is an invoice number on the receipt, you can enter the invoice number here.
b. Discount – Enter the discount dollar amount here if you received a discount for this purchase. For example, if you received a discount at AED 10, enter 10 here.
c. Paid toggle– As this field is related to a receipt, the default assumption is that the receipt has already been paid. Therefore, the Paid toggle is turned on by default.
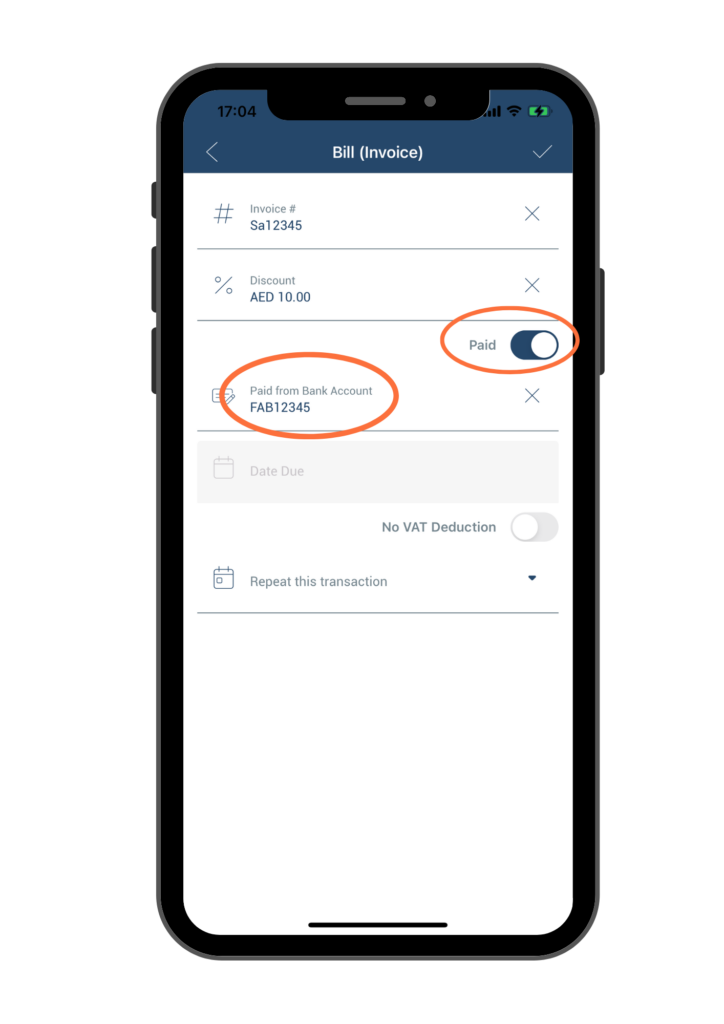
c1: If you have already paid for the receipt, do not change the toggle. Instead, enter the bank account number in the “Paid from Bank Account” field.
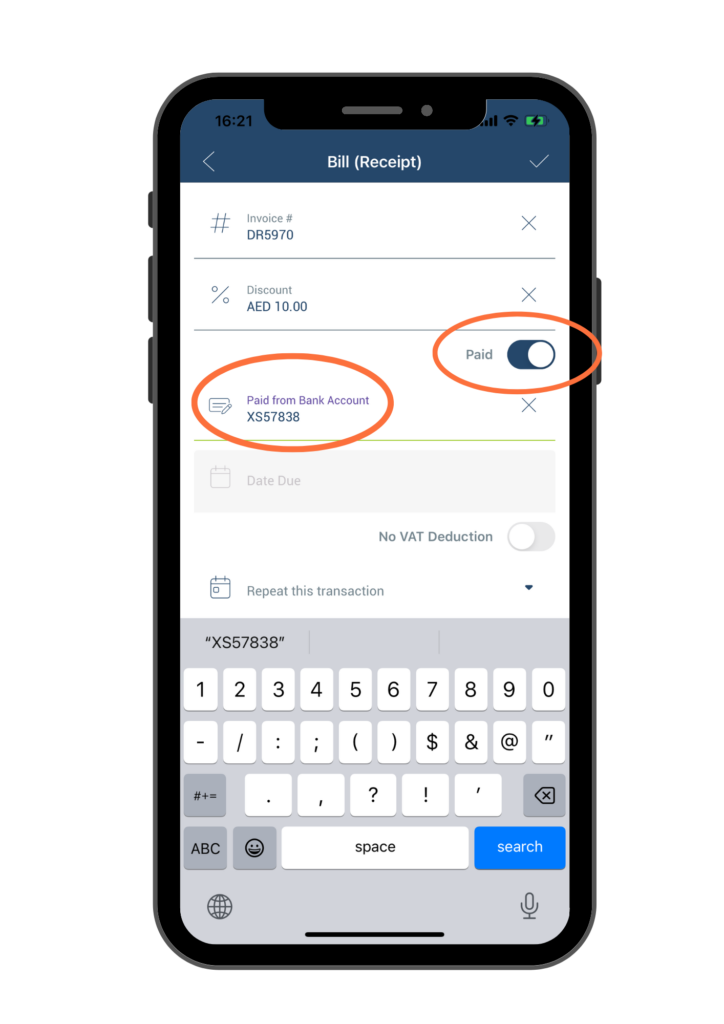
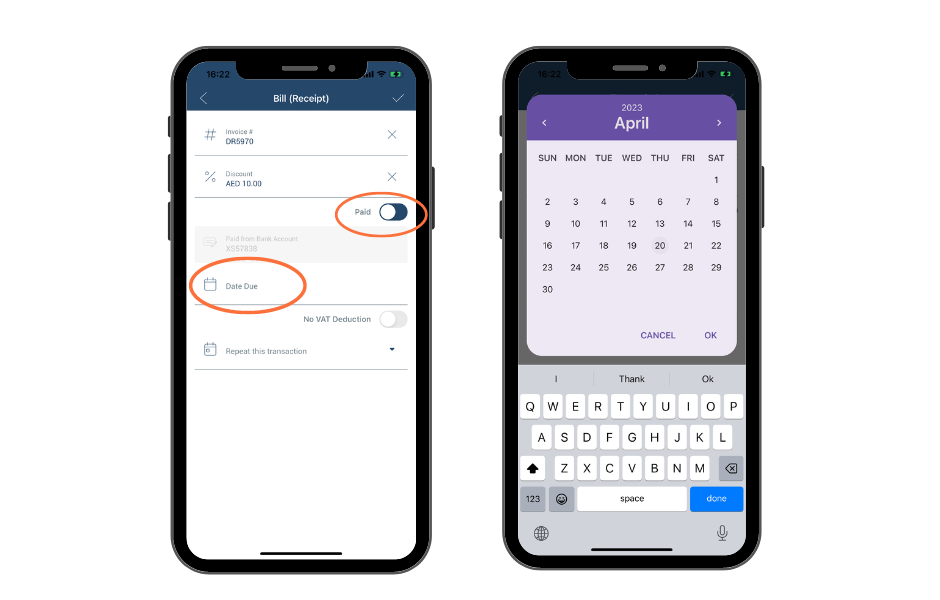
c2: If you didn’t pay for the purchase yet, switch the toggle to the left. Then click on the Date Due.
On the pop-up calendar, select the date that the bill is due. Make sure the due date is in the future.
d. No VAT deduction toggle
If the expense or cost is for a non-VAT deductible item listed above, simply toggle on the No VAT Deduction option by switching it to the right.
💡 In the UAE, Value Added Tax (VAT) is charged at a standard rate of 5% on most goods and services. The following are some of the expenses and costs that are typically deductible for VAT purposes:
- Business expenses such as office supplies, rent, and utilities
- Capital assets used for business purposes, such as vehicles, machinery, and buildings
- Goods and services that are directly related to the production of taxable goods or services
- Goods and services that are exported from the UAE
- Zero-rated supplies, such as basic food items, medical supplies, and educational services
- Advertising and marketing expenses for business purposes
- Training and education expenses related to business purposes
- Professional services such as legal and accounting services
- Import of goods and services subject to VAT
💡 However, there are certain expenses and costs that are not deductible for VAT purposes. These include:
- Personal use vehicle expenses, such as fuel, maintenance, and insurance for personal use vehicles
- Insurance premiums for personal or non-business purposes
- Entertainment expenses for personal purposes or for treating customers
- Donations made to charities or non-profit organizations
- Personal expenses, including clothing, jewelry, and personal care items
- Employee benefits such as health insurance, life insurance, and pension
e. Repeat This Transaction
If you plan on making this purchase repeatedly, you have the option to choose the frequency of this transaction. Click on the Dropdown arrow, and select the desired frequency from the list.
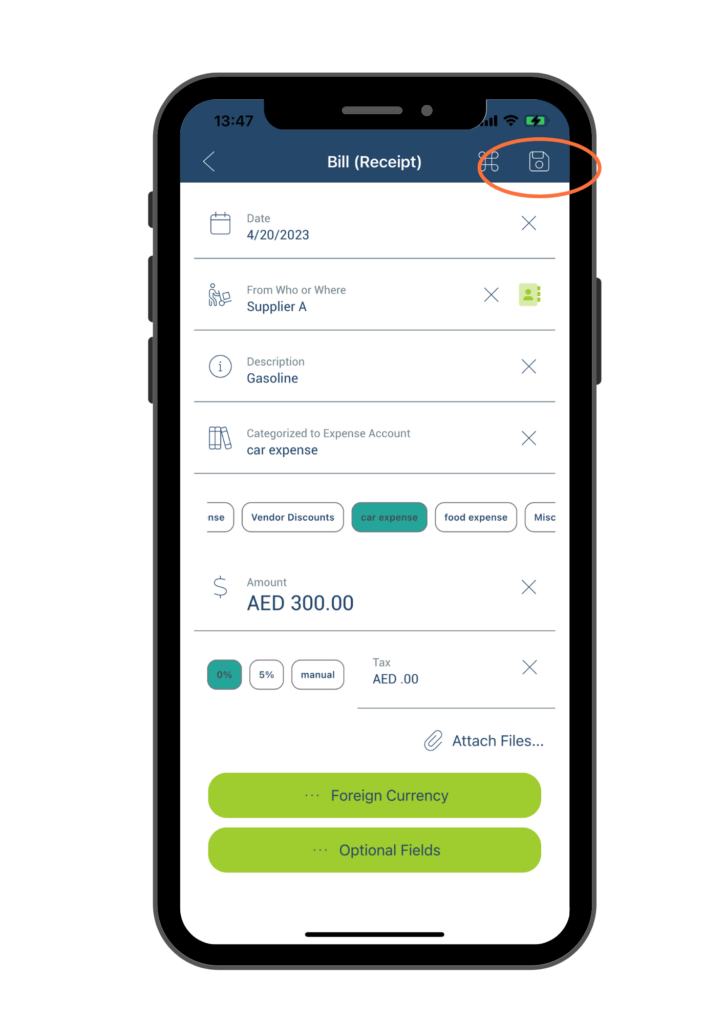
Once you have entered all the required information, you can save it by clicking on the check mark button located at the upper right corner of the page.
After entering all the necessary information, click on the Save button located at the upper right corner to save the receipt.
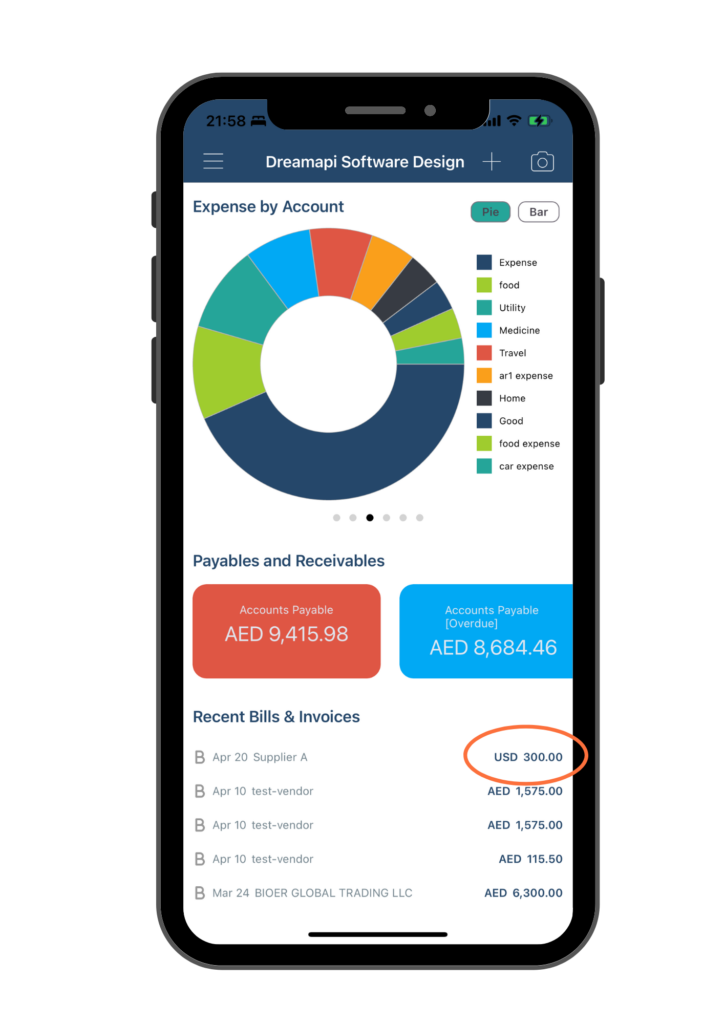
Once saved, you will be brought to the Dashboard page, refresh the page by pulling it down. The Charts will be updated with the new data, and the Payables and Receivables amounts will be adjusted accordingly. Additionally, a new entry will appear in the Recent Bills & Invoices section with a letter “B” on the left side, indicating that it is a Bill. You can double-click on this entry to review and edit its details.
Option 2: Bill (invoices)
Option 2 is for the scenario when you receive a bill/vendor invoice to manually add it to the entries. Click on Bill(invoices) on the actionsheet, you will be brought to a form titled Bill(invoices) to fill in the required information.
Bills (invoices) are designed for bills or vendor invoices that typically include multiple line items and a due date for payment. Different from Bill (receipts), Bill (invoices) form enables user to enter multiple line items in the Amount field, the user can also set a due date of the bill in Optional Fields.
Note: In the Option 2 introduction, we only outline the unique features of Bills (invoices). Many of the features for Option 2 are similar with Option 1, you may refer to Option 1 Bill (receipts) for any instructions that are not explicitly mentioned below.
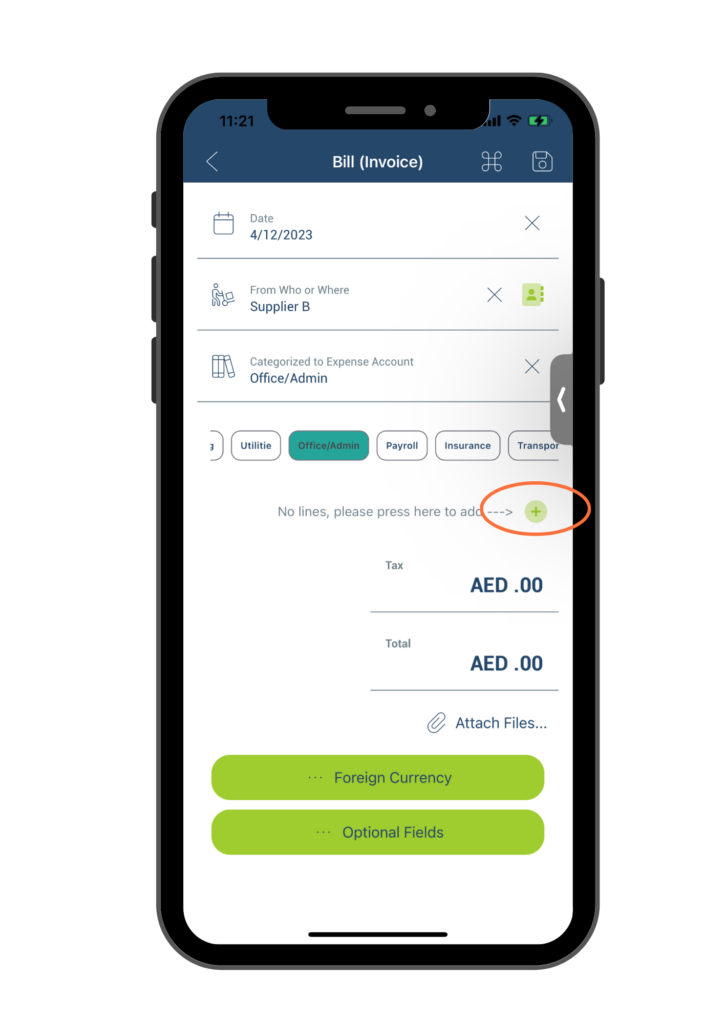
A. Add line items in Amount
To add a line item to the Amount field in the Bill (invoices) form, simply click on the “+” icon.
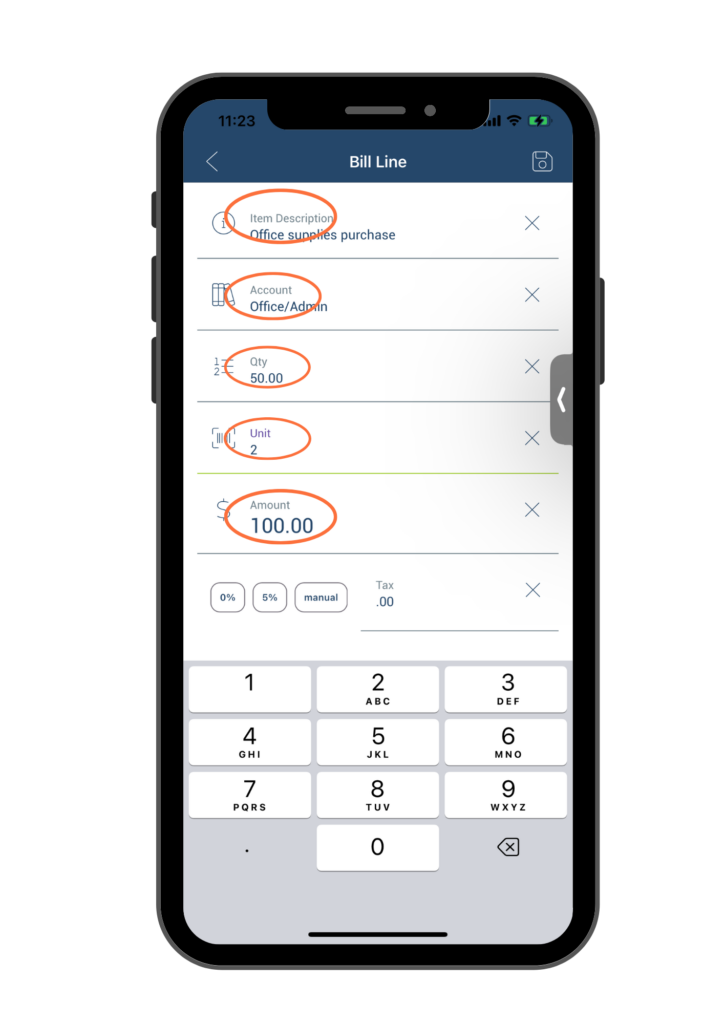
You will be brought to the Bill Line page, please follow the steps below to add information on the Bill Line page:
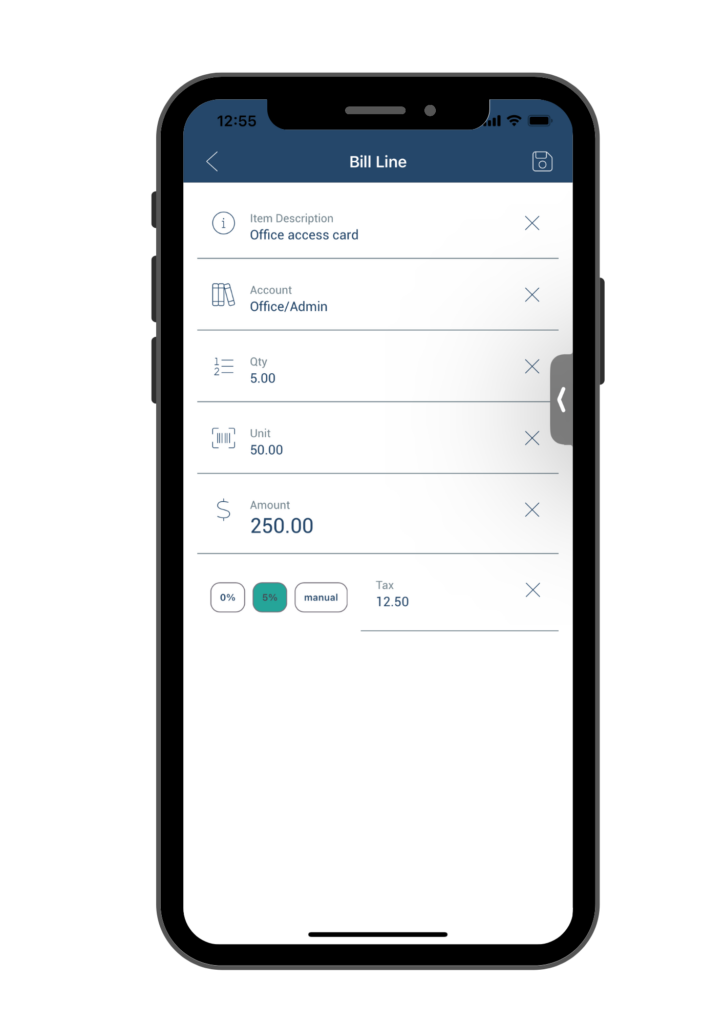
A1. Item Description – This field is used to describe what you are paying for. For example, if you are purchasing some office supplies, you may write “Office supplies purchase” in this field.
A2. Account – The account name that was selected/entered on the previous page will be automatically populated here. If necessary, you can change the account name to a different one for the line item.
A3. Quantity – Please input the quantity of goods or services you purchased for this specific line item.
A4. Unit price – Please enter the price per unit of the goods or services purchased for this line item.
A5. Amount – Once you have entered Quantity and Unit price, the total Amount for the line item will be automatically populated.
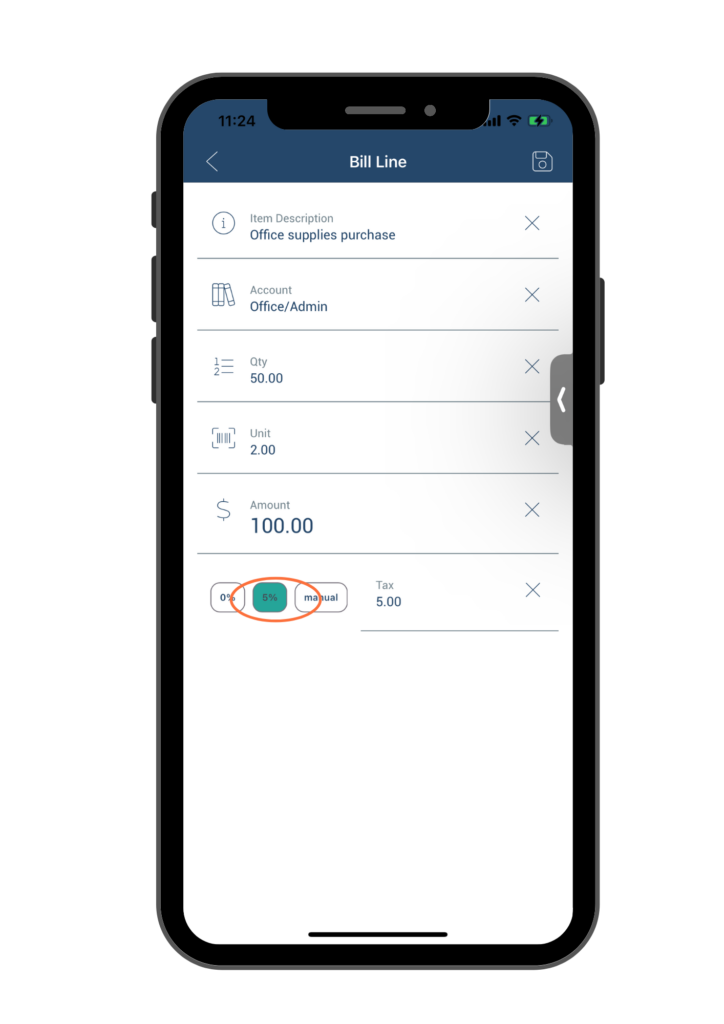
A6. Tax
To include tax applied to your purchase, click on the Tax field and input the corresponding tax amount. In UAE, the standard VAT rate is 5%, and you can quickly input this rate by tapping the 5% button.
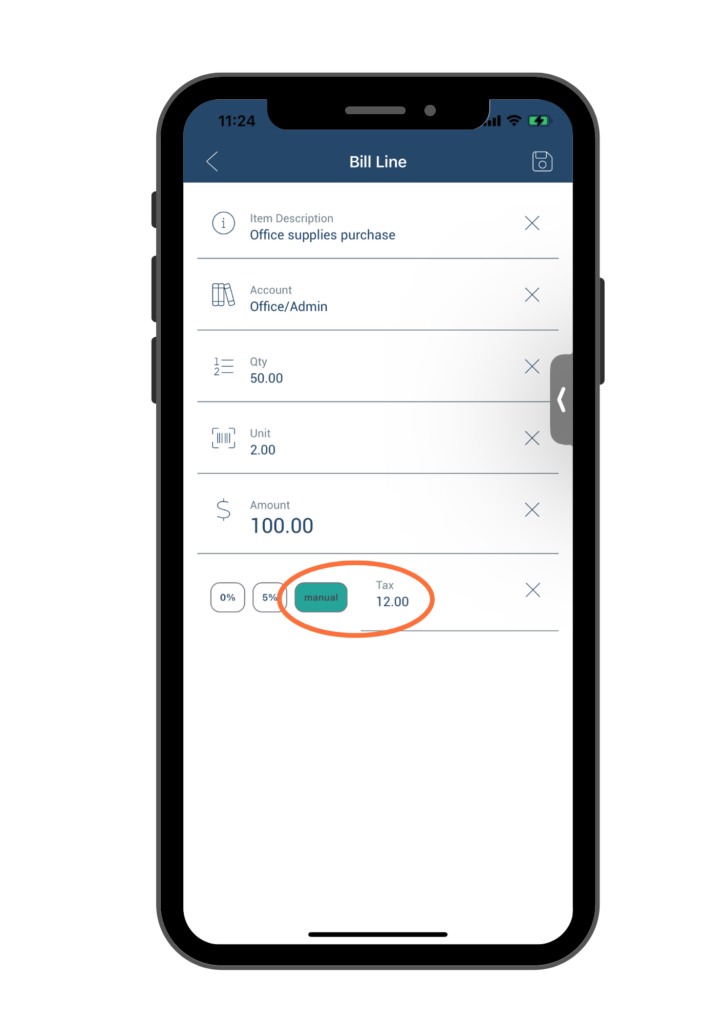
If a different tax rate was applied, you can tap on the manual button and manually enter the tax amount in the Tax field. Please note that when manually entering the tax, you need to input the exact tax amount instead of the tax rate. For example, if the tax amount on your bill is AED 12, you should enter 12 in the Tax field.
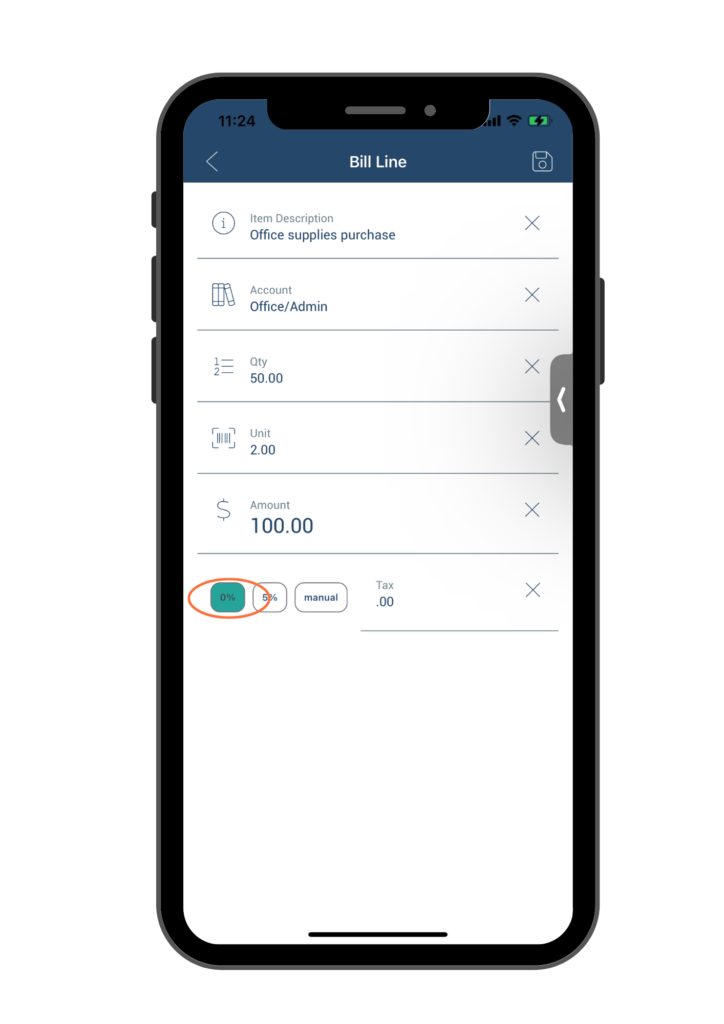
To indicate that your purchase was not taxed, simply click on the 0% button in the Tax field.
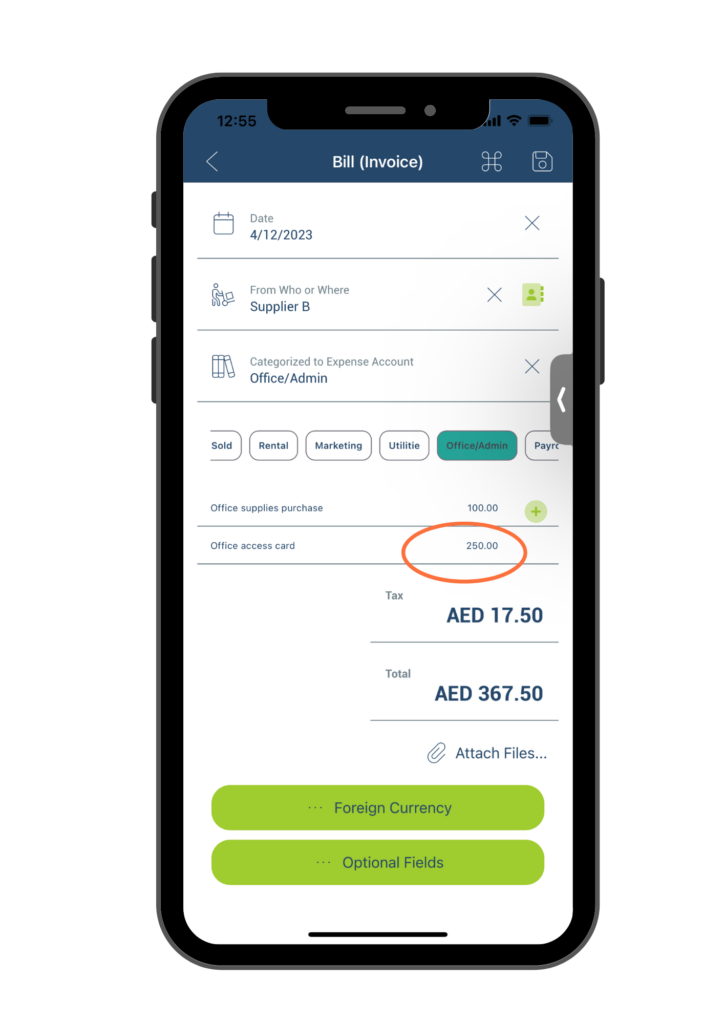
If you have multiple line items on a single bill, you can click on the “+” icon to add additional lines and enter the required information for each line item.
For example, if there is another item on the bill such as “Office access card” with an amount of AED250, you can add a second line to the Bill(invoices) form to account for this expense. Here is how the Bill Line information page would appear after you have filled in the required information:
After you have completed entering all necessary information on the Bill Line page, click on the Save button located at the upper right corner to save your entries.
Once saved, you will be directed back to the Bill(invoices) page where you will see the new line items that you have entered.
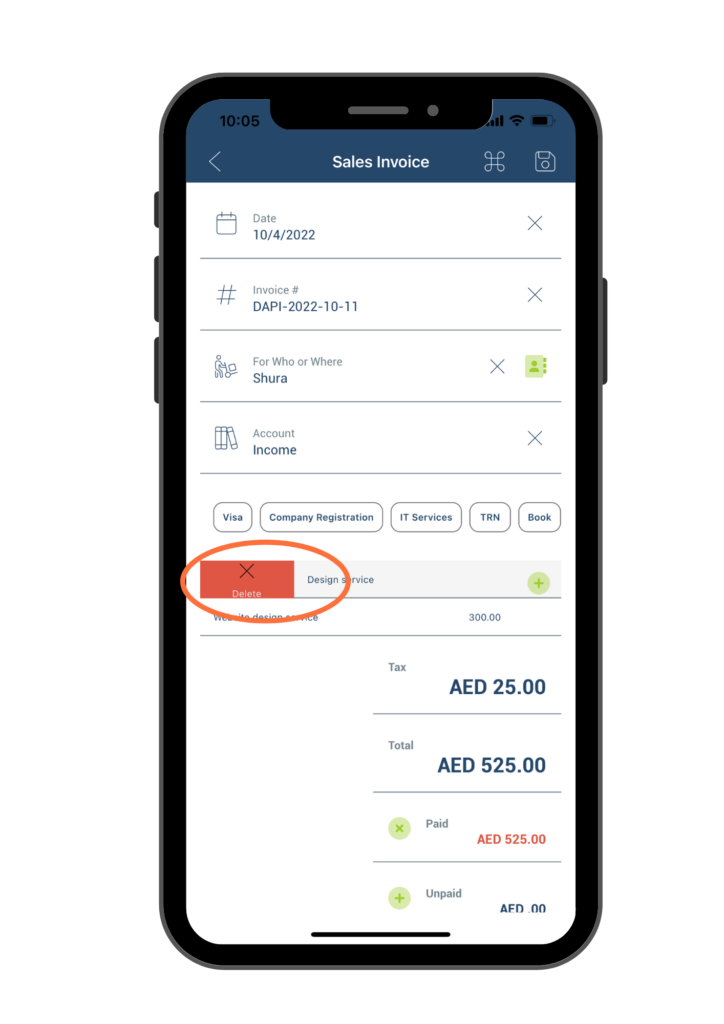
To delete any line items, simply swipe the line item to the right, and a red delete button will appear on the left side of the line. Click on it to delete the item.
B. Add or edit Optional Fields
To use this feature, click on the Optional Fields button located at the bottom of the Bill(invoice) form.
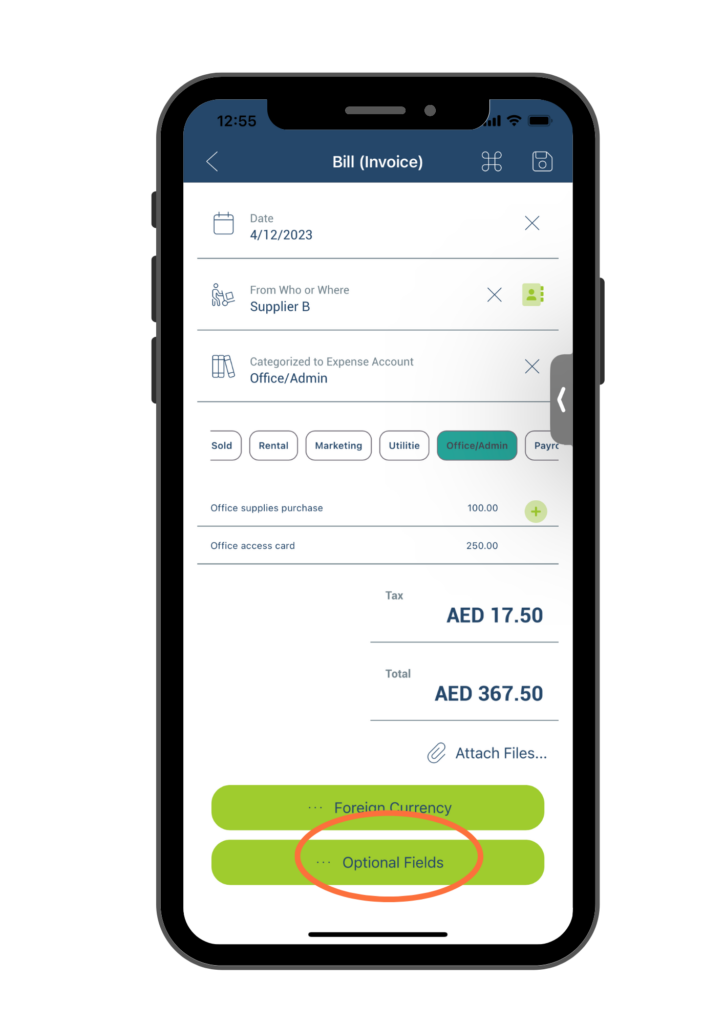
Note: The Optional Fields form in Option 2 Bills (invoices) shares most of the features with Option 1 Bills (receipts) with the exception of the Paid toggle. For instructions of other fields, please refer to Option 1 Bills (receipts) section.
By default, in Bill(invoices) the Paid toggle is turned off to indicate that the bill has not been paid, which is normally the case. However, you can turn the toggle switch on or off in the following scenarios.
Scenario 1. If you have paid for the bill, toggle the switch to the right to indicate that it has been paid. Then, enter the bank account number in the Paid from Bank Account field.
Scenario 2. If you have not yet paid the bill, keep the toggle unchanged (i.e., the toggle should remain on the left side). Next, click on the Date Due field.
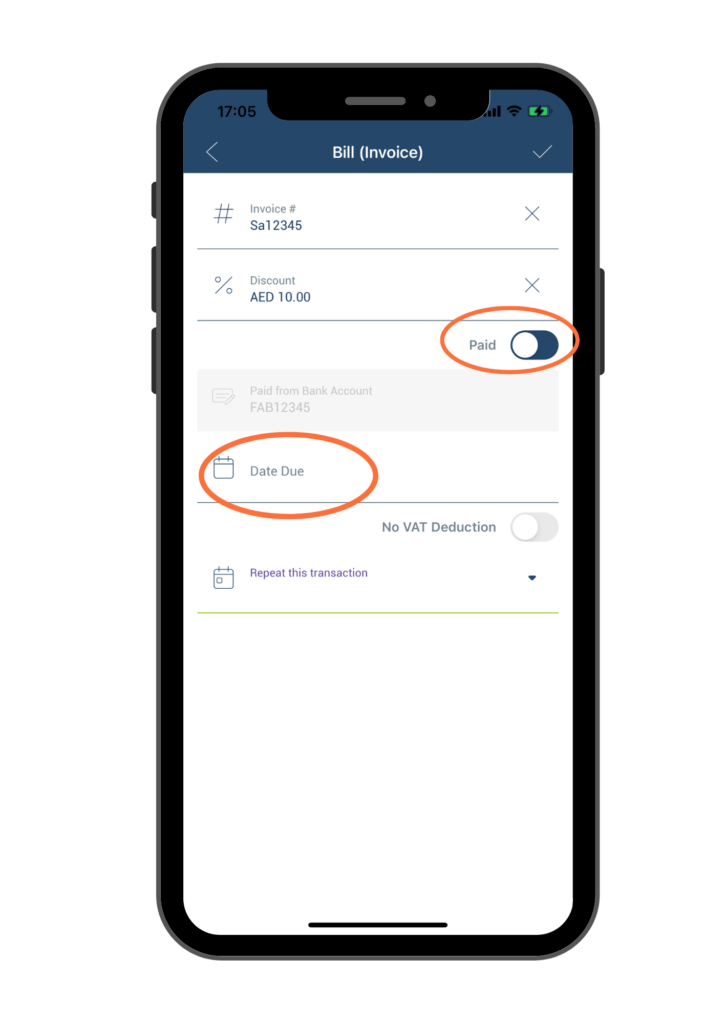
On the pop-up calendar, select the date that the bill is due. Make sure that the date you select is in the future.